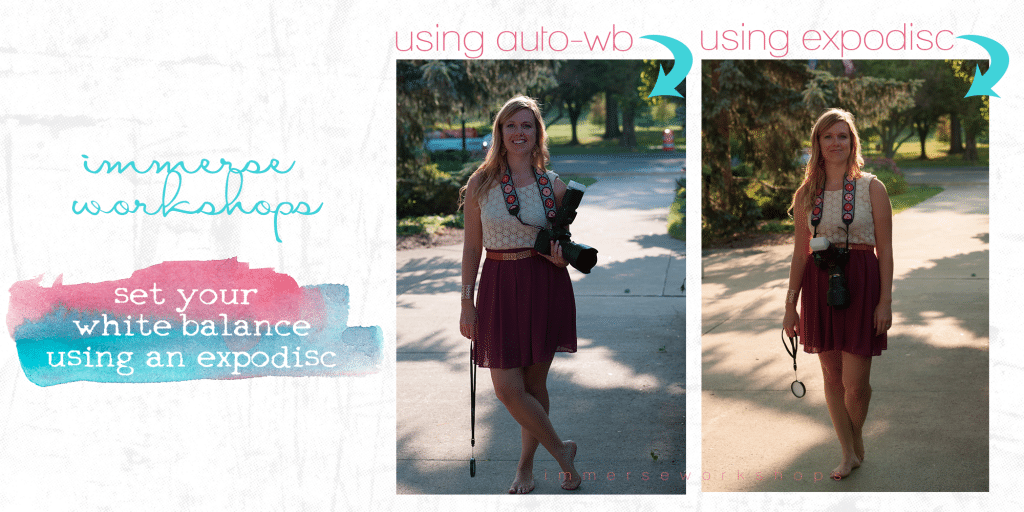
Sparkly photogs, are you having a craptastic time getting your white balance straight? No worries! I got you! I want to give you a quick overview of how to save your sanity and time in post-processing. Let’s take a few minutes and learn how to set your white balance with an Expodisc. You can thank me later.
Those photos you see above? Those are photos a friend of mine took while I was teaching him about the Expodisc. If you take a look at these SOOC images, in addition to being under-exposed (too dark) you can see a clear difference in the two images – one is cooler, the other is much warmer. Now, some of you might not like your images that warm (this girl does), but it’s an accurate representation of the actual light on that day!
White Balance Basics
So. How do we make our images more consistent and have accurate white balance? Order of biz #1. I’m going to assume you already know what white balance is and how it affects your photos. If not, no worries! Watch my quick instructional video now by clicking here.
Now you’re ready to learn how to set your white balance with an Expodisc. I am going to recommend that you invest in the 77mm Expodisc. It’s big enough to cover a wide variety of lenses; and, if it’s too big, you just hold it in place and all is good. Are you ready to learn? Let’s go.
Set your white balance with an Expodisc – it’s simple!
Keep in mind, I’m a Nikon 810 girl – so these directions are specific to Nikon users. If you have a crop sensor, the location of your buttons may be slightly different – but they ARE there! Just do a little hunting! Canon shooters – you also have the ability to control your white balance with the Expodisc, after watching this tutorial, refer to your manual for your specific instructions! Let’s make it happen:
- Get your ISO, aperture and shutter speed situation handled like a boss.
- Find your WB button (you may have to look in your menu depending upon your camera model)
- Hold that button down with your left hand.
- With your right hand, scroll or click to PRE and hold down WB button until PRE blinks. This allows you to pre-set your WB.
- Take your hood off if you’re using one (if you use a filter, that’s fine to stay).
- Pick up your new BFF (the Expodisc, duh) and put it over your lens, white side facing the camera.
- Hold down your WB button and watch PRE blink at you (sweet! it’s working).
- Walk over to your subject and face your light source (this measures the light falling on your subject – not the light around your subject)
- Snap a photo.
- If you look at the camera and it says ‘good’ you’re for sure good to go!
- If you get a ‘no good’ reading (maybe if you’re in an extreme situation or losing light) give that Expodisc a little more light and try again. You also have to be speedy, as the “PRE” button will only blink for 3-5 seconds!
Visual Learner? No prob! Watch me Set My White Balance in this YouTube Tutorial!
One little disclaimer about the video? I set my white balance…. and then the sun came out while I was mid-video. Thus…. this video is WAY too warm. But for reals. The Expodisc does do a good job AND I do know how to use white balance. I’m a kick butt photographer and business coach… just never claimed to be a videographer! HA HA HA HA!
See?! SUPER easy-peasy. Once you get the hang of it, using the Expodisc will become an essential part of your photoshoot workflow. I always start by setting my exposure settings, then the next step is my white balance. Every shoot. Every time. And you know what? For a girl who has a hard time seeing color, I’ve found that I’m MUCH more consistent in my images AND I spend way less time in post-processing!
Are you ready to get your Expodisc? Of course you are. Ain’t nobody got time for finnicky white balance and you WILL NOT regret this investment. Click here to check it out on Amazon to order yours today!
Are you a pro (or aspiring pro) photographer?
I teach online workshops for both professional and amateur photographers! I’d love to help you learn more about social media and ensure your business survives (and thrives) in this crazy online world! Join my free community to get valuable tips delivered right to your inbox and info on the latest courses and workshops to help you shine online! Plus you’ll get to select a free mini-workshop of your choosing! That’s awesome, right?! Click here to pick your workshop and join my FREE online community!

ps – I know some of you are die-hard Kelvin fans. You know your numbers and manually dial them in every time. For me? It just doesn’t work. I find I’ll spend 60 seconds tinkering with my Kelvin settings and taking test shots… and wasting valuable shooting time. The expo-disc takes me about five seconds. So, from a business perspective it just makes sense for me. Please don’t hate on those of us who love the expo-disc. It’s not because we can’t, it’s because we’ve made an informed decision about our photoshoot workflow! Yes? Ok. Now we can still be friends!
I just watched your video on the expo disc. I have a senior shoot in 2 hours. Wish me luck!
oh so exciting!!!!!! how did it go?!?!?!